The Best Fluffy Pancakes recipe you will fall in love with. Full of tips and tricks to help you make the best pancakes.
⭐⭐⭐⭐⭐ 4.9/5
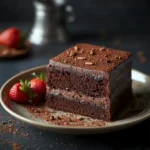
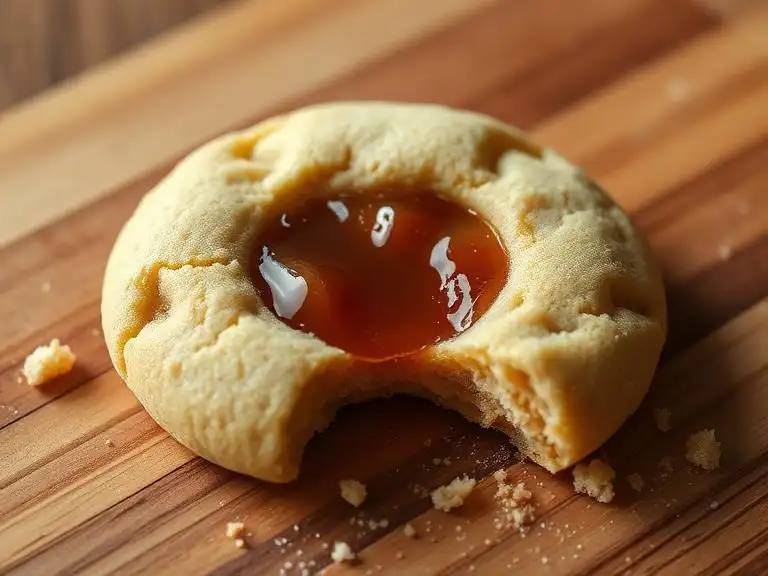
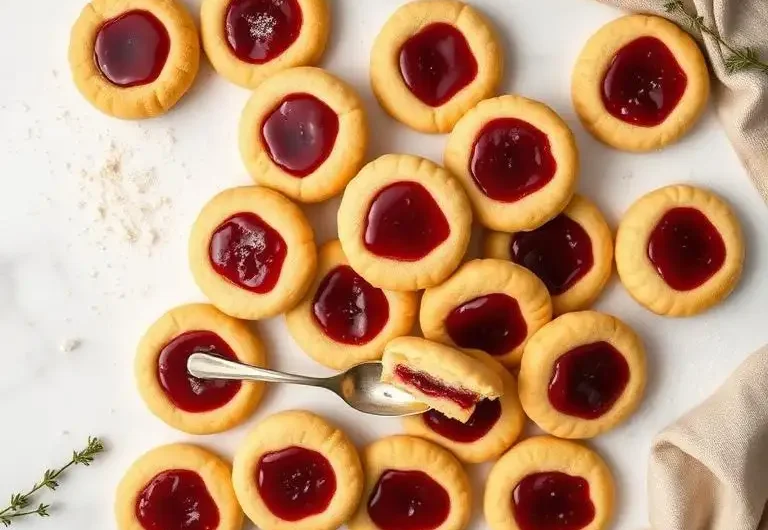
Texture: Tender, buttery soft center with lightly crisp golden edges and a jewel-bright jam filling. These are the kind of cookies that disappear fast.
| Prep Time | 15 minutes |
| Chill Time | 30 minutes |
| Bake Time | 12–14 minutes |
| Total Time | 1 hour |
| Yield | 12 cookies |
| Category | Cookie Recipes |
Why You’ll Love This Thumbprint Cookie Recipe
thumbprint cookie recipe : This easy thumbprint cookie recipe delivers real bakery-style results at home — no mixer required, no complicated techniques. The secret is a high butter-to-flour ratio combined with a short chill, which controls spread and locks in that signature melt-in-your-mouth texture. Whether you fill them with raspberry jam, lemon curd, or chocolate ganache, these cookies look like they came from a boutique bakery window.
If you’ve been searching for the best recipe for thumbprint cookies that’s both simple and stunning, this is it.
Ingredients
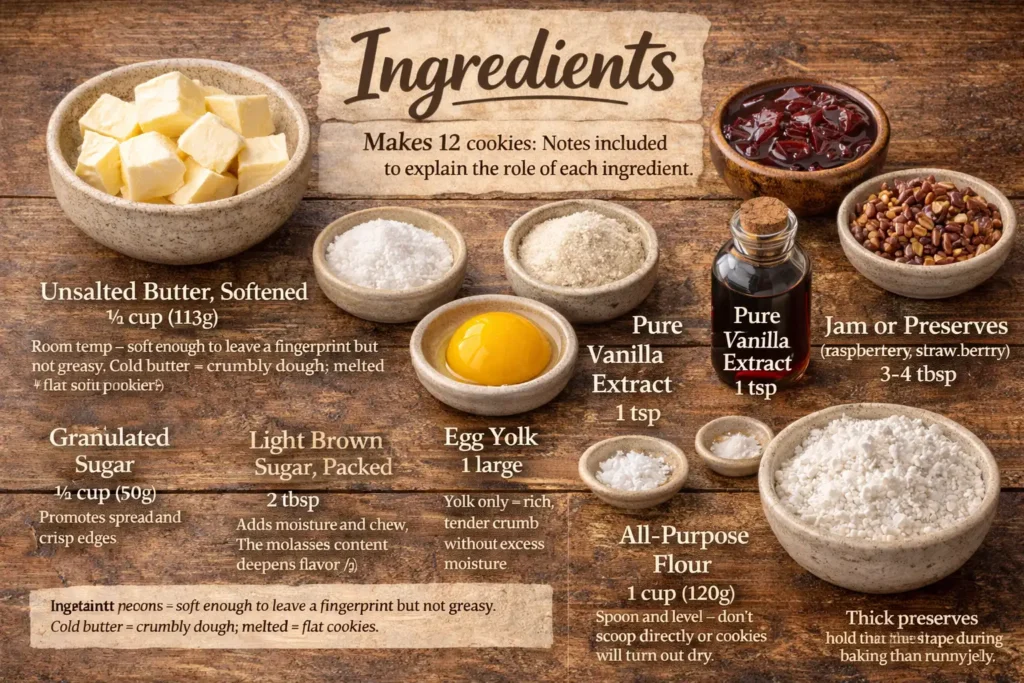
Makes 12 cookies. Notes included to explain the role of each ingredient.
| Ingredient | Amount | Notes |
|---|---|---|
| Unsalted butter, softened | ½ cup (113g) | Room temp — soft enough to leave a fingerprint but not greasy. Cold butter = crumbly dough; melted = flat cookies. |
| Granulated sugar | ¼ cup (50g) | Promotes spread and crisp edges. |
| Light brown sugar, packed | 2 tbsp | Adds moisture and chew. The molasses content deepens flavor. |
| Egg yolk | 1 large | Yolk only = rich, tender crumb without excess moisture. |
| Pure vanilla extract | 1 tsp | Use pure, not imitation, for clean flavor. |
| All-purpose flour | 1 cup (120g) | Spoon and level — don’t scoop directly or cookies will turn out dry. |
| Salt | ¼ tsp | Balances sweetness and amplifies butter flavor. |
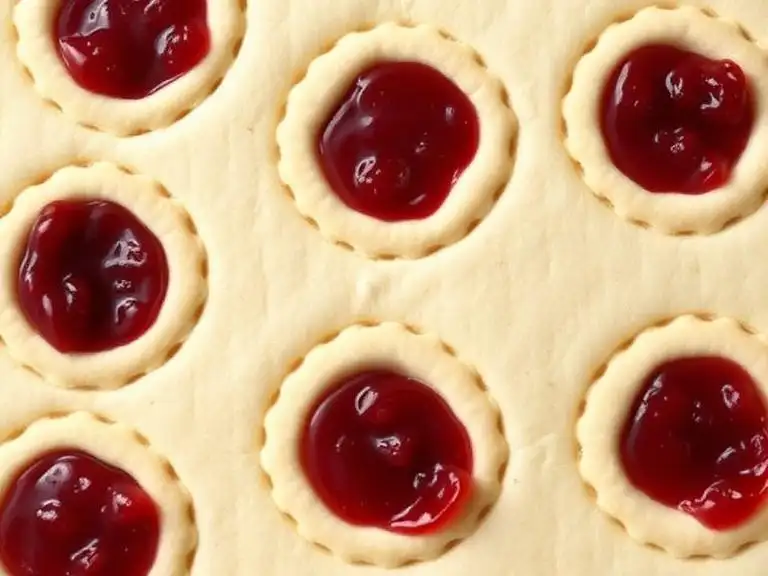
| Jam or preserves (raspberry, strawberry, apricot) | 3–4 tbsp | Thick preserves hold their shape better during baking than runny jelly. |
OTHER RECIPES :
- The Best Easy Cake Donut Recipe (Old-Fashioned & Fluffy)
- Pumpkin Dump Cake Recipe: Easy Fall Dessert Every American Must Try
- Best M&M Cookie Recipe (Thick, Gooey & Easy to Make)
Instructions
Step 1 : Make the Dough
In a medium bowl, beat softened butter with both sugars until pale and fluffy, about 2 minutes by hand or 1 minute with a hand mixer. Add the egg yolk and vanilla, mixing until just combined. Fold in flour and salt until a soft, cohesive dough forms — it should pull cleanly from the sides of the bowl and feel like Play-Doh. If it crumbles, your butter may have been too cold; knead briefly with warm hands.

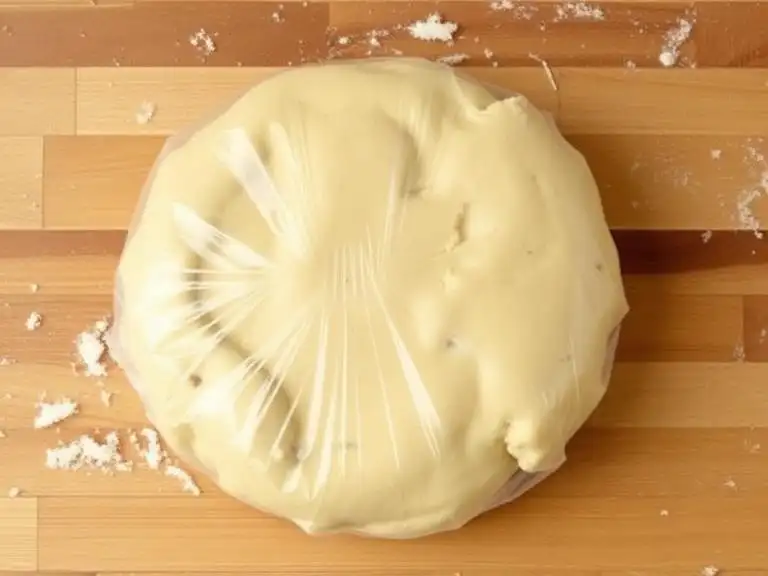
Step 2 : Chill the Dough
Wrap the dough tightly in plastic wrap and refrigerate for 30 minutes minimum (up to 24 hours). This step is non-negotiable: chilling solidifies the butter, which controls spread during baking and creates defined, rounded cookies instead of flat, greasy discs. Don’t skip it.
Step 3 : Shape and Indent
Preheat oven to 350°F (175°C). Line a baking sheet with parchment paper. Roll chilled dough into 12 equal balls (about 1.5 tablespoons each — use a cookie scoop for consistency). Place 2 inches apart on prepared sheet. Press your thumb or the back of a ½ teaspoon measuring spoon firmly into the center of each ball to create a deep well. The dough may crack at the edges slightly — that’s normal and adds a rustic, bakery look.
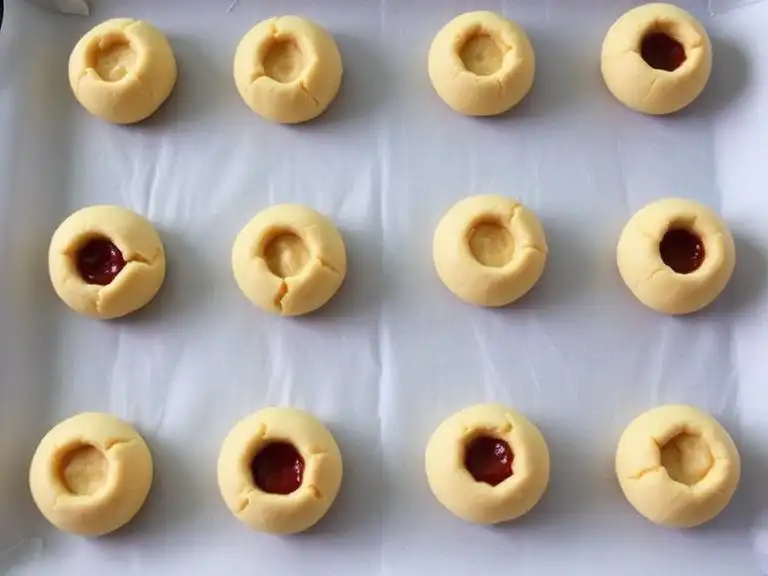
Step 4 : Fill and Bake
Fill each indentation with about ¼ teaspoon of jam. Don’t overfill — jam expands as it heats. Bake for 12–14 minutes, until the edges are set and just turning golden and the tops look dry but the centers still appear slightly soft. They will firm up as they cool. Watch carefully after 11 minutes; overbaking kills the chew.
Step 5 : Cool and Set
Transfer cookies to a wire rack and cool for at least 10 minutes before serving. The jam sets as it cools — resist the urge to eat them immediately (or don’t, we won’t judge). Store in an airtight container at room temperature for up to 5 days.
Pro Cookie Tips
Control spread: If your cookies spread too much, your butter was too warm or you skipped chilling. Chill the shaped, unbaked cookies for 10 minutes on the sheet before baking if your kitchen is warm.
Maximize chewiness: The combination of brown sugar + egg yolk is your chew insurance. Don’t substitute whole eggs — the white adds too much water and creates a cakier, less chewy texture.
Thickness and size: Keep balls uniform at 1.5 tablespoons. Smaller cookies bake faster and turn crispier throughout. Larger ones stay softer in the center — adjust bake time by 1–2 minutes accordingly.
Filling alternatives: Try Nutella, lemon curd, dulce de leche, or chocolate ganache. For chocolate-filled versions, fill after baking and let the ganache set at room temperature.
Re-pressing the well: If your thumbprint puffs up during baking (common), use the back of a measuring spoon to gently re-press the center immediately when the cookies come out of the oven while still soft.
Nutrition Information
Per cookie (with jam filling), approximate values:
| Nutrient | Amount |
|---|---|
| Calories | 118 kcal |
| Total Fat | 7g |
| Saturated Fat | 4.5g |
| Carbohydrates | 13g |
| Sugar | 7g |
| Protein | 1g |
| Sodium | 50mg |
Nutrition is estimated and will vary based on jam type and exact ingredient brands.
Why These Are Bakery-Style Cookies
Most home thumbprint cookie recipes produce flat, forgettable shortbread rounds with filling that bubbles away. These are different for three reasons:
The dual-sugar base — granulated for structure and spread, brown sugar for moisture and depth — mirrors what professional bakers do to build flavor complexity. The egg yolk-only formula is a classic patisserie technique that eliminates excess water and creates a tender, rich crumb more similar to a French sablé than a standard butter cookie. And the mandatory chill step is the same trick bakeries use to keep cookies tall, defined, and consistent batch after batch. Together, these three elements elevate a simple recipe into something that genuinely looks and tastes like it came from a real bakery case.
Frequently Asked Questions
1. Can I make thumbprint cookie dough ahead of time? Yes. The dough keeps refrigerated for up to 3 days or frozen (shaped into balls) for up to 2 months. Bake from frozen, adding 2–3 minutes to the bake time.
2. Why did my thumbprint cookies spread flat? The most common cause is butter that was too soft or melted. Make sure your butter is at proper room temperature (68–70°F), and always chill the dough before baking.
3. Can I use salted butter? Yes. Just omit the added salt in the recipe. The cookies will still taste great.
4. What’s the best jam for thumbprint cookies? Thick preserves work best — raspberry, strawberry, and apricot are classics. Avoid thin jelly, which can run out of the well during baking.
5. How do I keep the thumbprint from puffing up? Press the well deep enough before baking. If it still puffs, immediately re-press with a measuring spoon as soon as they come out of the oven.
6. Can I freeze baked thumbprint cookies? Yes — freeze in a single layer, then transfer to a container. They keep up to 2 months frozen. Thaw at room temperature for about 30 minutes.
7. Why use only the egg yolk? Yolks add richness and fat without the water content of egg whites, which can make cookies puff and turn cakey. The yolk-only method produces a denser, chewier, more flavorful cookie.
8. Can I make these gluten-free? A 1:1 gluten-free flour blend (like Bob’s Red Mill) works well in this recipe. The texture will be slightly more crumbly but still delicious.
9. How do I get uniform cookies? Use a #40 cookie scoop (1.5 tablespoon capacity) for consistent sizing. Weigh balls if you want precision — each should be about 22–24 grams.
10. Can I roll these in sugar before baking? Absolutely. Rolling the dough balls in granulated or coarse sugar before pressing adds sparkle and a subtle crunch to the exterior — highly recommended for holiday baking.
Tried this thumbprint cookie recipe? Leave a rating and let us know your favorite filling in the comments!
Easy Thumbprint Cookie Recipe – Perfectly Buttery Every Time
Course: Dessert, cookiesCuisine: AmericanDifficulty: EasyServings
12
YieldPrep time
15
minutesCooking time
1
hourCalories
118
kcalChill Time
30
minutesBake Time
12–14
minutesThis easy thumbprint cookie recipe delivers real bakery-style results at home — no mixer required, no complicated techniques. The secret is a high butter-to-flour ratio combined with a short chill, which controls spread and locks in that signature melt-in-your-mouth texture. Whether you fill them with raspberry jam, lemon curd, or chocolate ganache, these cookies look like they came from a boutique bakery window.
Ingredients
Unsalted butter, softened½ cup (113g)
Granulated sugar : ¼ cup (50g)
Light brown sugar, packed2 tbsp
Egg yolk1 : large
Pure vanilla extract :1 tsp
All-purpose flour1 : cup (120g)
Salt : ¼ tsp
Jam or preserves (raspberry, strawberry, apricot) : 3–4 tbsp
Directions
- Step 1 : Make the Dough
In a medium bowl, beat softened butter with both sugars until pale and fluffy, about 2 minutes by hand or 1 minute with a hand mixer. Add the egg yolk and vanilla, mixing until just combined. Fold in flour and salt until a soft, cohesive dough forms — it should pull cleanly from the sides of the bowl and feel like Play-Doh. If it crumbles, your butter may have been too cold; knead briefly with warm hands. - Step 2 : Chill the Dough
Wrap the dough tightly in plastic wrap and refrigerate for 30 minutes minimum (up to 24 hours). This step is non-negotiable: chilling solidifies the butter, which controls spread during baking and creates defined, rounded cookies instead of flat, greasy discs. Don’t skip it. - Step 3 : Shape and Indent
Preheat oven to 350°F (175°C). Line a baking sheet with parchment paper. Roll chilled dough into 12 equal balls (about 1.5 tablespoons each — use a cookie scoop for consistency). Place 2 inches apart on prepared sheet. Press your thumb or the back of a ½ teaspoon measuring spoon firmly into the center of each ball to create a deep well. The dough may crack at the edges slightly — that’s normal and adds a rustic, bakery look. - Step 4 : Fill and Bake
Fill each indentation with about ¼ teaspoon of jam. Don’t overfill — jam expands as it heats. Bake for 12–14 minutes, until the edges are set and just turning golden and the tops look dry but the centers still appear slightly soft. They will firm up as they cool. Watch carefully after 11 minutes; overbaking kills the chew. - Step 5 : Cool and Set
Transfer cookies to a wire rack and cool for at least 10 minutes before serving. The jam sets as it cools — resist the urge to eat them immediately (or don’t, we won’t judge). Store in an airtight container at room temperature for up to 5 days.
Notes
- Control spread: If your cookies spread too much, your butter was too warm or you skipped chilling. Chill the shaped, unbaked cookies for 10 minutes on the sheet before baking if your kitchen is warm.
- Maximize chewiness: The combination of brown sugar + egg yolk is your chew insurance. Don’t substitute whole eggs — the white adds too much water and creates a cakier, less chewy texture.
- Thickness and size: Keep balls uniform at 1.5 tablespoons. Smaller cookies bake faster and turn crispier throughout. Larger ones stay softer in the center — adjust bake time by 1–2 minutes accordingly.
- Filling alternatives: Try Nutella, lemon curd, dulce de leche, or chocolate ganache. For chocolate-filled versions, fill after baking and let the ganache set at room temperature.
- Re-pressing the well: If your thumbprint puffs up during baking (common), use the back of a measuring spoon to gently re-press the center immediately when the cookies come out of the oven while still soft.